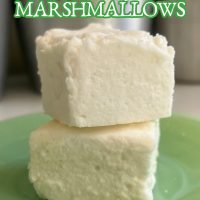
How to Make the BEST Homemade Marshmallows
This post may contain affiliate links. If you make purchase after clicking a link, I may receive a commission at no extra cost to you.
Homemade Marshmallows are such a treat to have on hand. Marshmallows are not only fun to make but also taste incredibly better than the store-bought ones. With just a few ingredients and some simple steps, you’ll be on your way to creating fluffy, soft clouds of sweetness that you can enjoy by themselves, in your hot chocolate, or as part of your favorite desserts.

Homemade Marshmallows
Have you ever made your own fluffy homemade marshmallows?
If this is your first time, you’re in for a real treat! Unlike the ones you find in the grocery store, these homemade marshmallows are incredibly light and fluffy, and you’ll want to make over and over again!
I promise, y’all! They are SO GOOD!
You can just eat the marshmallows as a treat or top a cup of hot chocolate or this s’mores milkshake. Or use my homemade marshmallow recipe for making s’mores brownies for a sweet treat to end the week.
Why You Should Make Homemade Marshmallows
-
Simple Ingredients: My homemade marshmallow recipe uses simple ingredients that you can easily find at any grocery store.
-
Flavor Customization: With the option to use pure vanilla extract or a combination of other flavor extracts, you can customize the flavor to your liking.
-
Fun to Make: The process of making marshmallows from scratch is surprisingly fun, especially if you involve your kids. My kids love watching the gelatin mixture transform into fluffy homemade marshmallows!
-
Better than Store-Bought: These marshmallows are far superior in flavor and texture to anything you can buy at the store. They are soft, fluffy, and melt perfectly in rich hot chocolate.
-
Versatile Use: Whether you’re topping hot cocoa, making s’mores, or enjoying them on their own, these marshmallows add a special touch. You can even dip them in chocolate for chocolate-dipped marshmallows!
-
Budget-friendly: Making your own marshmallows is cost-effective compared to purchasing a bag from the store. Plus, you can make a large batch that lasts.
-
Long Shelf Life: Stored in an air-tight container, these marshmallows keep well at room temperature for about 3 weeks, making them a great make-ahead treat.
-
Custom Shapes and Sizes: Unlike the uniform shapes of store-bought marshmallows, making your own allows you to cut them into any size or shape you like. Just think – for Valentine’s Day you can cut them into hearts!

Homemade Marshmallows Ingredients
- Unflavored Gelatin: Gelatin is what helps our homemade marshmallows keep their structure. It acts as a gelling agent, making them firm yet soft. Make sure to use unflavored for this recipe.
- Cold Water: It’s best to use filtered water to avoid any off-flavors. You’ll use it to dissolve the gelatin and also in making the sugar syrup.
- Granulated Sugar: This sweetens the marshmallows. You’ll cook it into a syrup with water.
- Corn Syrup: For homemade marshmallows you’ll need some light corn syrup (don’t use dark corn syrup).
- Salt: Just a bit is used to enhance the overall flavor of the marshmallows, making the sweet taste more pronounced.
- Vanilla Extract: This adds a classic, sweet vanilla flavor. You can also experiment with other extracts for different flavors.
- Powdered Sugar: Also known as confectioners’ sugar, this is used for dusting the marshmallows to prevent them from sticking together and to give a nice, sugary finish.
How to Make Homemade Marshmallows
- Prepare Your Pan: First, take a 9×9 or 8×8 inch dish and line it with aluminum foil, plastic wrap, or parchment paper. You’ll also want to spray it with nonstick cooking spray.
- Soak the Gelatin: In the bowl of a stand mixer, sprinkle gelatin powder over cold water. Let it soak for about 10 minutes. Using a stand mixer with a whisk attachment makes the process easier, but you can also use a large bowl and an electric hand mixer.
- Cook the Sugar Syrup: Next, in a medium saucepan, combine sugar, corn syrup, and water. Whisk until the sugar dissolves. Cook over medium heat until the mixture comes to a rapid boil. Once boiling, set a timer for 1 minute and let it boil without stirring.
- Mix the Gelatin and Sugar Syrup: Carefully pour the hot syrup into the bowl with the gelatin mixture. Start mixing on low speed and gradually increase to high speed. Add a pinch of salt. Continue beating for 10 to 13 minutes, until the marshmallow fluff is fluffy and has cooled to near room temperature. Then, mix in vanilla extract.
- Spread the Marshmallow Mixture: Using a spatula sprayed with nonstick cooking spray, evenly spread the marshmallow mixture into the prepared pan. Cover the top with wax paper, parchment paper, or plastic wrap also sprayed with nonstick spray.
- Let It Set: Allow the marshmallows to sit for 4-6 hours, or ideally, overnight. This resting time helps them firm up.
- Cut the Marshmallows: On a surface generously dusted with confectioners’ sugar, place the set marshmallow slab. Dust the top with more confectioners’ sugar. Use a large, sharp knife (spraying the knife with nonstick spray between cuts helps) to cut into squares.
- Dust Marshmallows: Dust all sides of the cut marshmallows with confectioners’ sugar to prevent sticking. Store your batch of fluffy homemade marshmallows in an air-tight container at room temperature. They will keep for about 3 weeks.

Homemade Marshmallow Variations
My basic vanilla marshmallow recipe can be customized in a variety of ways. Here are some ideas:
- Change the Shape: You can even use cookie cutters to make fun-shaped marshmallows. Just dip the cutter into powdered sugar and then cut into the marshmallows.
- Add Some Coloring: You can add food coloring at the end of whipping up your marshmallows if you want to make colored marshmallows.
- Chocolate Marshmallows: Add a little cocoa powder to my basic homemade marshmallow recipe for a chocolate marshmallows. Mix the cocoa powder with the sugar mixture before cooking it.
- Chocolate-Dipped Marshmallows: Once your basic marshmallows are cut and fully set, dip them halfway into melted chocolate. Let the chocolate harden for a an awesome treat. You can sprinkle the chocolate with sea salt, crushed nuts, or sprinkles for an extra special touch.
- Strawberry Marshmallows: Puree fresh strawberries and strain them to remove seeds. Replace the cup of water used to dissolve the gelatin with the strawberry puree for a fruity flavor.
- Coconut Marshmallows: Incorporate coconut cream in place of water in the gelatin mixture and add shredded coconut to the marshmallow mixture before it sets. Dust the cut marshmallows with a mixture of confectioners’ sugar and more shredded coconut.
- Mint Marshmallows: Add mint extract to the marshmallow mixture for a minty flavor. You can also add a few drops of green food coloring to emphasize the minty theme.
- Coffee Marshmallows: Dissolve instant coffee or espresso powder in the water used to make the sugar syrup.
- Almond Marshmallows: Add almond extract to the marshmallow mixture for a nutty flavor.

Storage
Store the marshmallows in an airtight container at room temperature. The marshmallows will last about 2-3 weeks easily. If they are getting sticky, just add more powdered sugar to the marshmallows.
I personally like to set each marshmallow inside of a cupcake liner and set those inside of a large airtight plastic container.

Tips for Making Homemade Marshmallows
- Try not to make marshmallows on a humid day. It can affect the texture, making it take longer for them to dry and set up.
- I recommend using a stand mixer or hand mixer as it is going to take a long time to whip up the marshmallows.
- Patience is key when you are mixing up the marshmallows. You have to mix and mix some more to allow enough time for the mixture to hit the stiff peaks texture before you pour into the pan.
- You can use a pizza cutter or a sharp knife that you dip in powdered sugar to help cut the marshmallows. You can also spray your knife with a nonstick spray instead before cutting. This will help keep the blade from getting sticky.
FAQs
Feel free to use the marshmallows for making smores and toasting them over an open fire or use a kitchen torch carefully.
If you overcook the mixture on the stovetop it can make the base chewy to almost a rubber texture.
Feel free to use a plant-based alternative if you want to make a vegetarian or vegan marshmallow. I recommend using agar-agar or your favorite plant-based gelatin alternative.
Yes, you can make homemade marshmallows without corn syrup, but it’s a bit more challenging. Corn syrup prevents the sugar syrup from crystallizing, which can happen quickly when sugar is melted and boiled down to 0% water. Without corn syrup, you risk the syrup turning back into crystals if it encounters cold water, a single grain of sugar, or is stirred.
To avoid using corn syrup, you can substitute it with other inverted sugars such as agave syrup, golden syrup (which adds flavor), maple syrup, or honey. These alternatives help keep the syrup from crystallizing. If you choose to make marshmallows with just sugar and no substitutes, it’s possible but requires caution. Avoid reintroducing sugar crystals, adding cold water, and stirring the sugar syrup.
Homemade Marshmallows
Ingredients
- .75 Oz Unflavored gelatin 3 envelopes of Knox gelatin
- 1/2 Cup Cold water
- 2 Cups White granulated sugar
- 2/3 Cups Light corn syrup
- 1/4 Cup Water
- 1/4 Teaspoon Salt
- 1 Tablespoon Pure vanilla extract Or a combination of other flavor extracts
- Powdered sugar To taste
Instructions
- Line a square 9x9 or 8x8 dish with aluminum foil sprayed with nonstick cooking spray. You can also do this with plastic wrap.
- In a large bowl, sprinkle the gelatin over the 1/2 cup cold water. Soak for about 10 minutes. I use my stand mixer for this but you can also use a large bowl with an electric hand mixer. You will just have to mi it for a really long time, so that’s why I like to use my electric stand mixer for this recipe. It makes homemade marshmallows so easy!
- In a small saucepan, combine the sugar, corn syrup, & 1/4 cup water. Whisk until the sugar is dissolved. Bring the mixture to a rapid boil. As soon as it comes to a boil, set your timer for 1 minute and allow it to boil hard without stirring during that time period.
- Carefully pour the boiling syrup into the large bowl with the gelatin that has soaked for 10 minutes. Turn on the mixer, start on low and work your way up to high speed. Add the salt and beat for 10 to 13 minutes, or until fluffy. It should have cooled down to near room temperature at this point as well. Now, beat in the extract.
- Spray a rubber or silicone spatula with nonstick cooking spray and spread the mixture into the prepared pan evenly. Spray a piece of wa paper with nonstick cooking spray (or use greased plastic wrap or parchment paper) and cover the top. Allow to sit 4-6 hours or preferably overnight.
- Sprinkle your cutting surface with a generous amount of powdered sugar. Remove the marshmallow from the pan and lay on top of the sugar. Dust the top well with more powdered sugar. Use a large sharp knife to cut into squares. I actually like to use a 12” mezzaluna knife when slicing my marshmallows. It is helpful to spray your knife with nonstick cooking spray between each cut to prevent sticking.
- Once cut into squares, dust the rest of the marshmallow sides with powdered sugar. Store in an airtight container. They should last at room temperature for about 3 weeks.